
Overview
This PowerLink provides a framework within which separate tools can be made available to users via a single proxy tool instance. A tool can be any functionality and can be made available to users based on their role within a section. The toolbox comes with three tools already built-in:
- adding and removing section instructors
- import calendar entries via a CSV file
- change the start date of section
Further tools can be written and easily added to the toolbox.
System requirements
The proxyToolbox PowerLink is written for WebCT Vista 4.1.1 (or higher) and WebCT Campus Edition 6.1.1 (or higher) but has only been tested with WebCT Vista 8.0. It requires the org.apache.commons.io, org.apache.commons.httpclient and webctdao.jar modules to be installed on the application servers. They should be placed either in the same directory as this PowerLink, or in the common directory to allow them to be shared with other PowerLinks. Individual tools may have additional requirements.
Description
There are many examples of small pieces of additional functionality which a PowerLink might offer to users but for which it
seems an unnecessary overhead to have to add each one to a section separately. In addition, some of this functionality may only
be relevant to section instructors and/or section designers and so the icons need to be hidden from students to avoid confusion.
This proxyToolbox PowerLink is designed to overcome this by providing a single PowerLink from which
multiple tools can be accessed. Thus, a single icon like
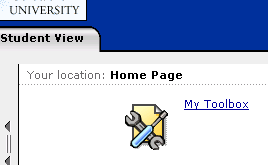
can be used to access a set of individual tools, such as:
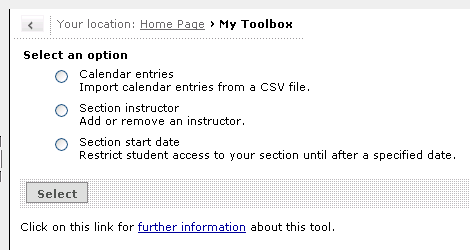
The list of options displayed to a user will depend upon those installed on the server and their role.
A simple framework is provided for the addition of new tools and access to each tool is controlled by user role. The current version of the proxyToolbox PowerLink is provided with three default tools but it is hoped that users will write their own to fit their own individual needs as well as make available others which may be of wider applicability.
Installation
This PowerLink is installed in the same way as any other WebCT Vista 4+ PowerLink:
- Create a directory called proxyToolbox in the deployablecomponents area of the WebCT domain directory on each application server (including the administration server for a cluster).
- Copy the proxyToolbox.jar file into the proxyToolbox directory.
- Place a copy of the dependent java packages in the same directory as the PowerLink or the Common directory so they can be shared with other PowerLinks
- Restart the WebCT service.
- Log into WebCT as serveradmin.
- In the Utilities, Settings area click on the link labelled proxyToolbox module in the System Integration column.
- Enable the tool by selecting the radio button labelled True for the enable setting and click on the Save Values button at the bottom of the page.
- In the Utilities, PowerLinks Proxy Tools area click on the Add Proxy Tool button.
- Select proxyToolbox module from the drop-down list and click on the Next button.
- Enter details as required in the boxes provided; for example:
- Proxy Tool Name: Toolbox
- Version: 1.0
- Description: Toolbox of user options.
- In the Utilities, Settings area click on the link labelled with the Proxy Tool Name entered in the previous step which should appear in the Tools column.
- Clear the tick in the Lock setting checkbox for the Enable Tool setting. Click on the Save Values button.
- Select the settings for the proxy tool again to enable the tool by default so that it is visible under the Add Content Link button within each section. Leaving it disabled will mean that Section Designers must enable the tool in each of their sections before it can be used.
Settings for tools can be specified in a properties file which should be located in the same directory as the jar file and have the same name but with an extension of .properties. Each property should be included on a separate line as a name/value pair and may be a general setting (e.g. name=value) or a tool-specific setting (e.g. toolname.settingname=value). This facility is useful for server-wide settings; instance-specific settings may be specified using the optional settings option on the configuration page (see below).
Configuration settings
The proxyToolbox PowerLink has the following custom configuration settings:
| Name | Level [see note 1] | Required? | Default value [see note 2] | Comments |
|---|---|---|---|---|
| URL for IMS import | Server | No | NA | Do not include the trailing / or any path; the current server is used when blank |
| IMS adapter secret | Server | No | NA | This should be the same as the secret entered in the System Integration API IMS Adapter |
| Roles permitted to access each option | Server | No | calendar=SDES,SINS,STEA,SSTU,SAUD;instructor=SINS;startdate=SDES,SINS | [see note 3] |
| Roles allowed to access each option | Section | No | NA | [see note 4] |
| Optional tool settings | Section | No | NA | Allows additional settings to be specified [see note 5] |
| URL for further information/help | Section | No | NA | When specified, a link is automatically added to the main tool selection page |
Notes:
- The level specifies the level of the learning context hierarchy at which this setting should be specified; it may, of course, be inherited from a higher level except for the space code suffix which is set automatically at the section level. Due to a bug in WebCT, value for settings at levels above Section should be edited for the module in the System Integration column of the Utilities area and not for the proxy tool itself in the tools column (see the known issues page for details).
- A setting value of NA is treated as an empty string; this is a workaround to the SDK bug relating to locked empty settings (see the known issues page for details).
- The format of this entry is tool1=role1,role2 which means that the tool tool1 may be used by any user with any or all of the roles role and role2. To specify roles for more than one tool separate them with a semi-colon. For example, the default value allows all section users to access the calendar tool but only section designers to use the instructor tool. Each tool is only made available to those roles listed; if a tool does not have an entry then it will be disabled. The tool names used should match those used in the Java source when registering the tool (see below).
- This setting at the section level allows the server-level roles permitted to access a tool to be further limited. The format of the setting is the same as in note 3; to disable a tool specify an empty list of roles (e.g. instructor= will disable the instructor tool).
- The setting allows additional setting values to be specified for general use or for specific tools. Each setting is written as a name and value pair separated by an equals sign (e.g. name=value). Multiple settings should be separated with a semicolon (e.g. name1=value1;name2=value2). To specify a setting for a specific tool prefix its name with the tool name followed by a fullstop (e.g. toolname.name=value); the name of the tool is removed before passing the setting to the tool so that the tool code is not dependent upon the name used.
Usage
Follow these steps to add a link to the toolbox within a section:
- enable the tool (if it is not already) by selecting the proxy tool from the Manage Course, Settings page
- on the Build tab, click on the Add Content Link button and select the Toolbox proxy tool
- select an existing instance of this tool, or click on the Create button to add a new one
- enter a title to be displayed on the page, enter any tool restrictions (see below)
- click on the Save button
The settings for each instance of the proxy tool can be changed by clicking on the icon from the Build tab. For example, the tools which are available and the roles allowed to access each tool can be changed by specifying a value in the allowed roles setting. The calendar tool can restricted to use only by section designers and section instructors by setting this value to:
Note that it is not possible to give permissions for users to access a tool if their roles have not been granted permission at the server level (see configuration settings above). Thus, the following entry is likely to be ignored:
because students are not likely to be given permission to access the section instructor tool. Optional settings may also be specified according to the individual tools installed and their options.
Calendar entries import tool
This tool allows users to import calendar entries into their calendar. By default this tool is named
calendar and is available to all users with a
role of section designer, section instructor, teaching assistant, student or auditor. This can be restricted by
specifying the roles in the allowed roles setting of the instance of the toolbox (see above). Students and Auditors
can only import private entries but other users can select whether the entried in their file should be
imported with public or private status.
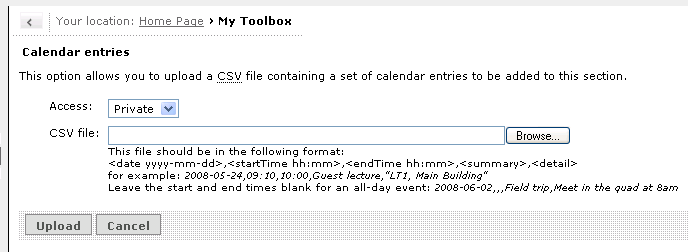
Calendar entries to be imported should be saved in a .csv file with the following format:
For example:
Leave the start and end times blank for an all-day event:
Use the 24-hour clock for time values. If the value itself contains a comma (e.g. LT1, Main Building as above) it should be enclosed by quotes. If the value extends over more than one line, you should also be enclosed in quotes. Each entry should begin on a new line.
To upload the file:
- Select the tool from the toolbox proxy tool
- Browse to the .csv file on your computer and select upload
- select OK from the successful file upload page
Note: if there are errors in the file format you will get a message detailing them. Lines with errors will not be imported but other items in the file will be created.
The calendar tool is dependent on the following packages:
This tool is based upon the Calendar Import Module PowerLink written by Paul Monk (WebCT) but does not require the import file to be uploaded to WebCT first.
Section instructor tool
This tool allows users to add section instructors to their section or remove existing section instructors (other than themselves).
By default, this tool is named
instructor and is only available to users with a role of section instructor. To add a section
instructor enter their WebCT ID in the box provided and click on the Add button. To remove a section
instructor, select the radio button next to their name and click on the Remove button.
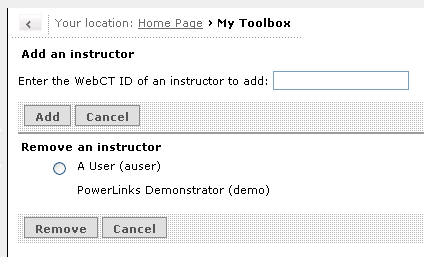
Note: the WebCT ID of the user must be known before they can be added as a section instructor. A message of "Sorry, the selected user does not exist" is displayed when a WebCT ID is entered which is not recognised.
Section start date tool
This tool allows users to change the start date for their section. By default, this tool is named
startdate and is only available to users with a role of section instructor.
Use of this tool makes most sense when student access to a section is restricted to being after the section
start date. This tool will then allow a section instructor to determine when students are able to gain access
to the section independently of any term settings. The access restrictions for a section are set in the
Learning Context Administration settings area.
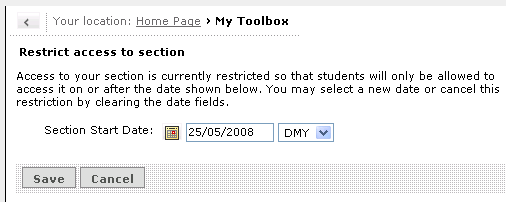
Dates may be entered in one of three formats:
- DMY - day, month, year order
- MDY - month, day, year order
- YMD - year, month, day order
The default setting is DMY; any non-digit characters are treated as separators between each of the date components. This can be changed by the user by selecting from the preferred option from the drop-down list on the form. The default setting may also be changed by including a property named startdate.dateformat in the properties file (see above) or as an optional setting in proxy tool configuration (see above). An optional setting will override any property value. When using the popup calendar tool, the date inserted into the form will use the format specified in the International Administration settings area. It is recommended that the default date format for this tool be set to be consistent with this setting.
Note: due to a bug in recent versions of WebCT, rather than clearing the start date for a section when no date is entered, the start date is set to 1 January 1970. This is treated by the tool as being an unset start date.
Creating new tools
This PowerLink is more than a structure for the tools already provided. It is also a framework which can be used by others to add new tools.
ProxyToolboxTool interface
A tool is merely an implementation of the ProxyToolboxTool interface. For example:
import com.spvsoftwareproducts.webct.tools.ProxyToolboxData;
import org.apache.velocity.VelocityContext;
import com.webct.platform.sdk.security.authentication.module.WebCTSSOContext;
import javax.servlet.http.HttpServletRequest;
import org.oscelot.webct.dao.LearningContextVO;
import org.oscelot.webct.dao.UserVO;
import org.apache.log4j.Logger;
class MySampleTool implements ProxyToolboxTool {
// Tool details
private static final String TOOL_DISPLAY_NAME = "My sample tool";
private static final String TOOL_DESCRIPTION = "A sample tool used to illustrate this PowerLink.";
// Velocity template page names
private static final String PAGE_NAME = "sample";
// class variables
private String message = null;
public MySampleTool() {
super();
}
public String getDisplayName() {
return TOOL_DISPLAY_NAME;
}
public String getDescription() {
return TOOL_DESCRIPTION;
}
public String processRequest(ProxyToolboxData data, VelocityContext velocityContext) {
/*
insert code to process interaction with user here. The data variable provides access to the
WebCTSSOContext, HTTP Request, current learning context, current user and the class logger.
Return the name of the velocity template file to be displayed to the user (this is not used
if a message is specified).
*/
return PAGE_NAME;
}
public String getMessage() {
return this.message;
}
}
The methods to implement are as follows (see the Javadocs for more details):
- getDisplayName - this should return the short name of the tool
- getDescription - this should return a longer description of the tool for use on the main options selection page
- processRequest - this method is called whenever a user selects the tool; it should return the name of the velocity template page to be displayed to the user
- getMessage - this method is called after processRequest and should return any message to be displayed to the user; if this value is not null the message is displayed rather than the velocity template page
The processRequest() method is passed an object of class ProxyToolboxData which provides access to various proxy tool data objects (see below) and a VelocityContext object which can be populated with variables to be referenced in the velocity template page to be displayed to the user. After this method has completed and before parsing the velocity template, the following additional variables are added to the context:
- InfoURL - the value of the URL for further information/help configuration setting
- Title - title for the proxy tool (WebCT toolbox) which is used as the page title
- ToolName - the name of the selected tool (not defined if none has been selected)
- ProxyToolID - the ID of the proxy tool instance
- ProxyToolURL - the URL to access a proxy tool instance
- ProxyToolURLId - the value of ProxyToolURL with a query string specifying the instance to be accessed
- ProxyToolURLIdTool - the value of ProxyToolURLId with an additional parameter specifying the selected tool
When creating an HTML form in a velocity template the action attribute of the form element should be set to the value of ProxyToolURLIdTool so that the data submitted is passed back to the tool. For example,
...
</form>
The processRequest() method should normally return the name of the velocity template to be parsed for display to the user. However, if the getMessage() method returns a non-null value, a standard message page is displayed to the user instead. This message page shows the message specified (which should be in HMTL; for example, "<p>Your request has been processed</p>") with a button labelled Continue (which returns the user to the tool) and a button labelled Cancel (which returns the user to the main option selection page).
ProxyToolboxData class
One of the parameters passed to the processRequest method is an object of class ProxyToolboxData which provides methods to access the following proxy tool related objects:
- Logger - for log messages
- WebCTSSOContext - for the current proxy tool context
- HttpServletRequest - for the current HTTP request
- LearningContextVO - for the current learning context
- UserVO - for the current user
- Parameter - for parameter values from the current HTTP request object
- Property - for settings specified in the properties file
- Setting - for configuration settings at both the server and section levels
- ToolName - as defined for the current tool
The section settings map will include any optional settings specified; both general settings and those prefixed with the name of the tool (this prefix is removed before the setting is added to the map). Each of these objects has an associated method to access it, as documented in the Javadocs. In addition, the following general purpose methods are also provided:
- nullToEmpty() - Convert a null string to an empty string
- parsePage() - Parses a velocity template
- uploadIMS() - Uploads an XML file to WebCT
- uploadXML() - Uploads XML to WebCT
See the Javadocs for more details.
Registering new tools
A tool is registered by adding a line like the following example to the initialize procedure in the ProxyToolModule.java file:
Tools are presented to users in the order in which they are registered. Obviously the existing tools can be used as examples of how tools may be written. Further details on preparing template files can be found on the Apache velocity project website and also on the Blackboard EduGarage site.
Note: the tool will not be enabled for use until appropriate roles have been added to the permitted roles configuration setting.
Troubleshooting
If you experience any problems using this PowerLink try the following to trace the cause:
- check the IMS shared secret is set to the same value in the System Integration API IMS Adapter module
- inspect the webct.log file for any reported errors
- as serveradmin, set the logging level for com.spvsoftwareproducts to DEBUG; the messages logged will be included in the webct.log file.
Version history
| Version | Date | Description |
|---|---|---|
| 1.0.00 | 25 May 2008 | Initial release |
Licence
 This work is written by Stephen Vickers and is released under a
Creative Commons GNU General Public Licence.
The proxyToolbox PowerLink is available for download from OSCELOT where
it is also possible to report bugs and submit feature requests.
This work is written by Stephen Vickers and is released under a
Creative Commons GNU General Public Licence.
The proxyToolbox PowerLink is available for download from OSCELOT where
it is also possible to report bugs and submit feature requests.
